
My sister's childhood friend is getting married this month, and she contacted me to see if I'd be interested in taking on her brooch bouquet project. Suuuuure. I've worked in a floral shop and my mom and I have done several weddings. How hard could it be? Buwhahahahahaha.

Okay, maybe not "hard", per se, but extremely time-consuming. And it's someone's bridal bouquet, you want it to be perfect. It will be forever immortalized in hundreds of wedding photos. No pressure.
So I'll show you an example of how I wired one of the brooches, but I literally did every single one different. Some were wired from the back. Some went down through the top. It just depends on the shape and style of the pin. The key is to get two sections of wire on each one, that can be twisted together. Otherwise, your pin will flop all over the place and it will be impossible to arrange the bouquet. I did the same thing with the earrings that she wanted to use.


These round pliers are perfect for twisting the wire.


Once you have the two wire pieces twisted together and there's no more flopping, you use floral tape to wrap the whole "stem."


Now do that 947 more times.
Okay, maybe not that many, but it will feel like it.
Your hands will heal up in about a week.
She didn't want any artificial flowers or leaves in hers, so I attempted to arrange it with just the wired pins.
This is where a lot of cussing happened.
It might be possible, but it wasn't happenin' for me.
So I bought a fake hydrangea.
I cut off the flower clusters and wired them individually, then clumped them together and used them as a base.
Sooooo much better.
It was like having a floral frog.
Okay, that's where my "tutorial" ends.
Here's an almost-done progress pic.
All the pieces, excluding silk buttons from her grandma's wedding dress (I know, how awesome is that?), are in, and aside from some excessive tweaking, where they're permanently gonna go.

You can see how the majority of the hydrangea flowers are hidden, but they help hide all the guts of the inside.

I ended up wiring more of the individual flower clusters to put around the base.
They helped hide the mass quantity of wires.

Next up, was covering the handle.
I wrapped the whole thing in floral tape, making sure there were no pointy wire ends poking out.
I wrapped the whole thing in floral tape, making sure there were no pointy wire ends poking out.
She had some ribbon she wanted to use, so I finished it with that.
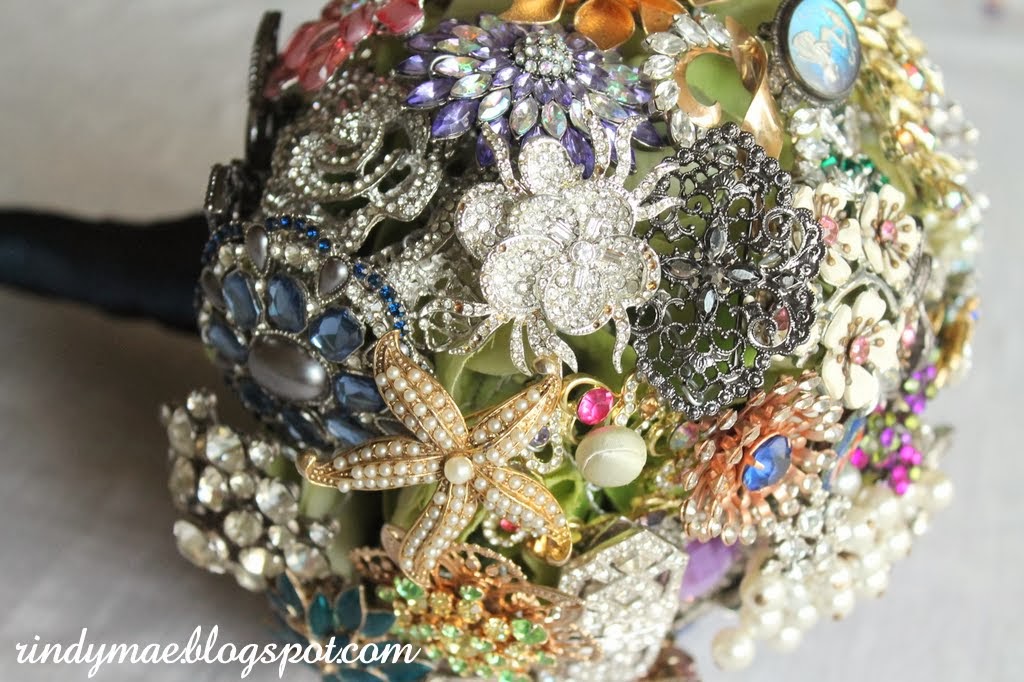
And now, I present to you, the, (500-hours-later), finished product.
With 500 photos. :)


As I mentioned the other day, I enlisted the help of The Girl to get photos of it being held.
Tablecloth "dress" and all.


And I sorta love these next ones, so I couldn't not put them in.


My mind is flashing forward to her own wedding slideshow.
With photos of her as a six-year-old, holding a bridal bouquet.
Be still my heart.
So there ya go.
The Brooch Bouquet.
And now, I can say I've made one.
Please see my sidebar for the parties I link up to.


I've never heard of a brooch bouquet and was thinking, hey, that looks cool, I should make something like that,....until I saw what was involved, lol. Gorgeous.
ReplyDeleteNice job and what a wonderful way to display a collection of brooches.
ReplyDeleteI just watched a show today called 'Four Weddings' on TLC and one of the brides made her own brooch bouquet. It's not the first time I've seen one but have never seen one in person.
Not even kidding right now when I say that my eyes are tearing up...what an honor to make this beautiful bouquet for the bride...Gosh it is just so very gorgeous friend!! Oh my goodness...I can just imagine the wedding..vintage and all things classic. You should be very proud of what you have created! And to be honest I have not seen many of these...Love your sweeties as always! They are just too cute! Awesome! Nicole xoxo
ReplyDeleteWow! It's really beautiful. You did a great job and I'm sure it will look amazing in her wedding photos. Was it heavy? And where did she get all those brooches?
ReplyDeleteThis was so well done, Mindy!! It is absolutely beautiful and crafted very well. You are so talented. I have never seen one of these before - glad you took photos of your girls with it!!
ReplyDeleteThis looks so fun!! What a creative way to use all the old brooches. How heavy did it turn out? How many brooches did you end up using?
ReplyDelete-Kat
www.confessionsoftheperfectmom.com
Hi, Kat. Heavy is an understatement. That sucker weighed a TON! I wish I had counted how many pins I used. I'd say 50 - 60, plus some clip-on earrings and silk buttons.
DeleteI think that looks wonderful - and like it took a long time to create. It will look amazing in pictures I bet.
ReplyDeleteMindy, this is beautiful! I had never seen one...I've been out of the wedding Pinterest pinning forever as I don't have any family or friends left to wed (guess that makes me officially OLD at 30). I think I must need to hang out with the single ladies...
ReplyDeleteWow, this is gorgeous--I bet your friend was thrilled! And it does sound like a time-consuming project, but what beautiful results.
ReplyDeleteVery cool, Mindy. I love it. Vintage jewelry is so alluring by itself but put together like this--awesome.
ReplyDelete