Wednesday, November 30, 2011

Sneak Peeks

I'm slowly, but surely, getting the house decorated for Christmas.  Wrangling 18-gallon totes down pull-down stairs to the attic while seven months pregnant isn't the simplest thing I've ever done.  The Christmas tree has been up since the day after Thanksgiving, but I've yet to decorate it. 

In between the holiday chaos, I've also been working on something for the "shared room".  Hence the constant whining about sanding, priming and painting.

I thought I'd give you a couple sneak peeks, just so you don't think I'm slackin' over here.  :o)

This is the third year of having a mantel at Christmas time.  One of the main reasons for building the fake fireplace was so I could have someplace to hang our stockings.  That sounds a bit excessive now that I say it out loud.  The first year I did a very symmetrical setup with matching containers of cyclamen on either end and candles in the middle.  This year, I pretty much did the exact same thing as last year, because I loved it so much.

Here's a teaser for ya:


Other than the tree, I came pretty close to finishing up with the decorating today.
I'll post pictures of everything once it's all done.

As for the other time sucker in my life right now, here's a glimpse of that:


Oh yeah, and this:


Those pieces are primed now, by the way.

And let's not forget these two:


They look pretty needy, don't they?

Baby Belly: 29 Weeks

If everything goes according to plan, I'm only 10 weeks out.  Holy mother.  I'm 7 months pregnant and I still randomly find myself just out of the blue thinking, Holy crap, I'm having a baby! 

I know my baby belly pictures aren't some super creative, fancy set-up that I see ideas for all the time, but they're more keepsakes for me than anything.  I didn't do any belly pictures of The Kid and The Girl, other than at the hospital, and I regret it.  I'm pretty sure the photos will be far less with round 3 than they were with round 1 (50 a day), so at least this one will have something that the other two don't. 

Okay, enough blabbing. 

Here's Baby at 29 weeks:


My shirts appear to be shrinking.
I'll need to speak to the laundry personnel about that.

Tuesday, November 29, 2011

Felt Ornaments

STOP
Unauthorized readers, please move along.
This post is not to be viewed by immediate family.


I've been posting my DIY gifts on Saturdays, but in case you haven't counted, there are only three left until Christmas Eve, so I figured I had better step it up a bit before I run out of time.  

Like the homemade Christmas cards, my mom has made ornaments every year since I was born.  Crazy woman.  I entered the land of crazy the year The Kid was born.  I haven't decorated our tree yet, but when I do, I'll share the ornaments I've made in previous years.

I got this year's idea off of Pinterest.  There were hundreds of ideas to choose from, but I thought these would be fun for the kids.  The link on Pinterest is to an Etsy shop, so once again, I'm ripping off someone's idea.  She has ton's of different ones, so you should pop on in for more ideas, or to actually buy some.  I also made two more that are similar, and there is a link to a tutorial for those, so you can see how they come together.  I figured they were pretty self explanatory, so I'll just tell you how I did it, minus the photo tutorial.

Click here to see the originals.


You'll need:

Felt
Embroidery Floss
Glue
Scissors
Beads
Poly Stuffing

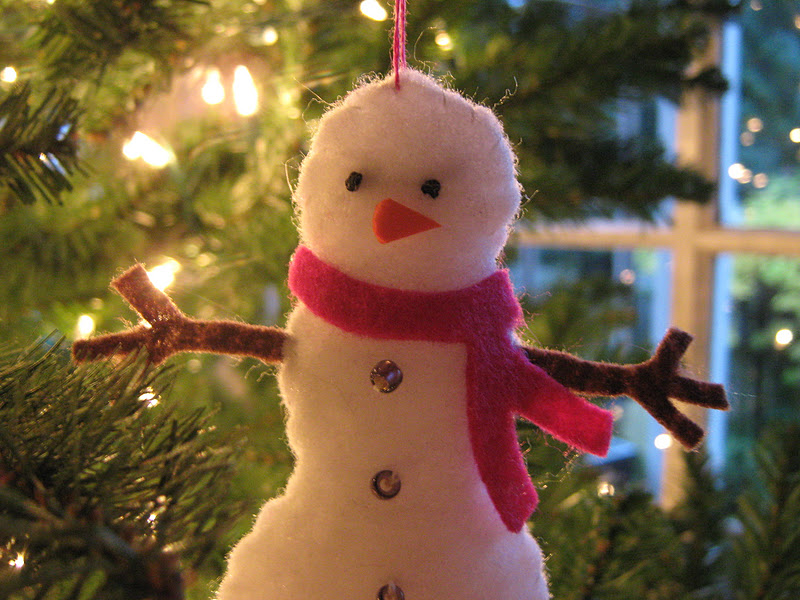
I used three different sizes of circle cookie cutters to trace for the snowmen, then cut two layers of felt at a time so the front and back would match up.
To the front piece of felt, I sewed on the beads and used black floss to make knotted eyes.
I cut out arms from brown felt.
I started stitching the back and front together at the bottom and left a big enough hole to cram the stuffing in.
Then I stitched the rest up.
I cut out a scarf shape and glued it on with Tacky glue.
 I forgot to buy orange felt, so I dug into the kids' project bin and found orange craft foam for the nose and glued that on as well.
I used more embroidery floss to make a hanger.
Easy peasy.

For the trees, I did the same thing.  
I cut two tree shapes and a trunk.
Sewed the beads on first and then stitched the back and front together with some stuffing.


I plan to have more finished projects posted thoughout the week.
Related Posts Plugin for WordPress, Blogger...
Pin It button on image hover