STOP
If you are unauthorized to read my Christmas gift posts, please move along.
This post is not to be viewed by blood- or marriage-related relatives who's last name starts with A and ends with O.
Yes, you know who you are, now close this window.
Okey dokey, for anyone who is coming by for the first time, I'm not mean, I swear. This is the first post, of what will be a series, of homemade gifts for Christmas. We don't want anyone's surprise being spoiled by a blog post.
Remember my estate sale post where I showed you all my crafty super scores? Well one of the bags had some completely random wooden things in it and most of them had been glued together.
Here's another shot in case you missed it:
It looks like some wooden flower pots and balls, right? I had no clue what in the world they were supposed to be or what sort of project never got finished. Then, two days after coming home with them, I saw something on one of the blogs I follow, Jane Of All Crafts. Wooden dolls. ADORABLE wooden dolls. I knew right when I saw them what my glued together flower pots were destined to become. Click here to see the dolls that Andi made. Her pieces are different than what I had to work with, so if you're wanting to make these, make sure you head over and have a look at hers.
Alrighty then, let's get started.
You'll need whatever wooden pieces you decide on.
As I mentioned, mine were already glued together, so glue yours accordingly.
Or, if you're using the nesting one's like she did, you won't even need to glue.
I didn't realize this when I started, but I had two different sized "people" in my bag.
Once the gluing is done, dig out some paint.
I used acrylics.
I put about three coats on, using a flesh color for their heads and mixed colors for their bodies.
Once they're good and dry, you can start in on their clothes and faces.
I chose to stick with the way Andi did her bodies and use just white.
You can certainly bust into more color choices.
Once I had mine completely done, I sprayed on three coats of rattle can sealer in semi-gloss.
Here's the new family that my 1-year-old niece will be adopting:
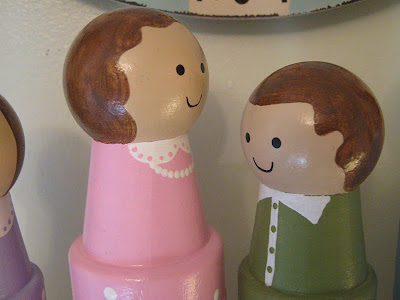
And some close-ups of each one:
The only thing left to do is wrap them!


Holy Cuteness! Those are flippin adorable!
ReplyDeleteOh my these are so stinkin cute. You have amazing creativity and I read your blog everyday. Thanks for the awesome inspiration and keep the Christmas gifts comin I cant wait to see whats next.
ReplyDeleteYAY!!! I think I like yours better! :) SOO CUTE! Thanks for sending me the link. I honestly thought I followed your blog :( Fixing that problem now!
ReplyDeleteHow adorable. They remind me of the playskool "little people" that my son used to play with. I'll say it again...your painting skills are awesome!
ReplyDeleteOMG, they are awesome! What a wonderful gift for a little girl. I am looking forward to more of your DIY Christmas gifts.
ReplyDeleteIt hurts to look at how cute these are. I can't believe that you can paint that well,....that is totally amazing.
ReplyDeleteThose are ADORABLE! I just found your blog today and I can't wait to read more of your posts:) Your homemade Christmas will definitely be at the top of my blog list;)
ReplyDeleteThese are the cutest things I've ever seen. What a fantastic job you did, you talented lady, you.
ReplyDeleteShe will LOVE them!!
Now, I need to read more..see ya later.
xo bj
Love these - I bought some wooden people pegs at JoAnn's because I saw her post too - yours are just adorable - I'm thinking these would be a great gift for my almost 3 yr old
ReplyDeleteI LOVE this!!
ReplyDeleteit turned out so cute!
Beautifully done, Mindy. You're so talented.
ReplyDeleteThese are awesome Mindy!
ReplyDeleteThose are absolutely adorable! Are they still available in stores? My daughter would love them. And yours are so perfect that I may do mine just like yours!!
ReplyDeleteHi Bronwyn! You can pick up the wood pieces at any craft store - either just like what I used or the typical peg doll components. Hope that helps and thanks for coming by!
ReplyDeleteThese are so darling!! LOVE!
ReplyDeleteHi I am coming across your blog Via 36th Avenue... These are just SO adorable... I have made the Clothes Pin Dolls in the past...But nothing like this.. So you know I am going to have to try this... :) I will be sure to link back here when I do... Also just became your Newest follower.. :)
ReplyDelete