STOP
If you are unauthorized to read my Christmas gift posts, please move along.
This post is not to be viewed by any immediate family members - by blood or marriage.
That includes anyone married to me.
Close this window and walk away.
Alrighty then, moving right along.
This project is a blatant rip off. I hope that's okay. I can't remember where I first saw it, possibly on Pinterest, but I immediately knew for sure I was going to make one for The Dad. The plan was to do it for our anniversary, but it just didn't happen. So Christmas gift it is.


Last week, I went to the Etsy store of the original to see if there were some more pictures I could use to recreate it and that's when I saw the other ones. SO CUTE! I'll tell ya, if I had the money, I'd be more than happy to send it their way. But I don't. So I'm making my own. You should go look in the shop. And buy something. I'm telling you, these things are so dang cute. Click here to go directly to the Etsy store.
For those of you who don't have a job like me want to attempt your own, here's what I used:

Frame
Double Mat
Scrapbook Paper
3-D Foam Squares
Tree Template
Sheet of paper printed with lyrics, a story, a poem, etc.
Scissors
Tape
Glue
X-Acto Knife
Cutting Pad
Twine
Sheet Copper
Pencil
Pen
One of the main reasons I decided to make three of these, (aside from them being so dang cute), instead of just the one for The Dad is, I had everything I needed except the frame and mat.
I went to Joann's last week when the frames were on sale for 60% off. I had a 25% off entire purchase on top of that. Plus a 40% that I used on one of the double mats - they weren't on sale. I walked out of the store with three 8x10 frames and three 8x10 double mats for $14.50. Not bad. The frames I picked came with their own single mats as well, so I have three extras for another project down the road.
Make sure your double mats aren't glued together.
They need to come apart.

I had these foam squares left over from the Framed Flower Art I made for my niece's birthday this spring.

I used garden twine 'cause I had it.

The roll of copper came from Joann's.
It's a bit heavier than tin foil.

I used a cookie cutter to trace my heart shapes.
The tree is just freehand.

For The Dad's, I used lyrics from At Last by Etta James.
It was our first dance song at our wedding.

So first off, you'll need to get your tree cut out.
I used a textured brownish paper for printing the lyrics on.
Get your tree situated on the paper where you want it.
Trace around your template, leaving plenty of space.
You don't want any pencil marks left once it's cut out.


Next, you'll need to decide on paper for your background.
I layed out my different options, with the tree, to see what I liked best.


Cut your background piece to fit behind the bottom mat layer and tape it to the back.

Flip it back over so it's right side up.

Now you can figure out where you want your tree to go.

When you think you've got it, lay the top mat down to make sure as much, or as little, of the tree is left exposed on the edges.

Carefully remove the top mat and put a piece of tape down at the trunk of the tree.

Fold the tree back toward you and attach 3-D foam squares to the back.


Fold your tree back up and attach it to the background paper.


At this point, you'll want to cut out whatever shapes are going to hang from the tree branch.
I used two copper hearts for The Dad's.
I used a cookie cutter to trace the heart shapes and sharp scissors to cut them out.

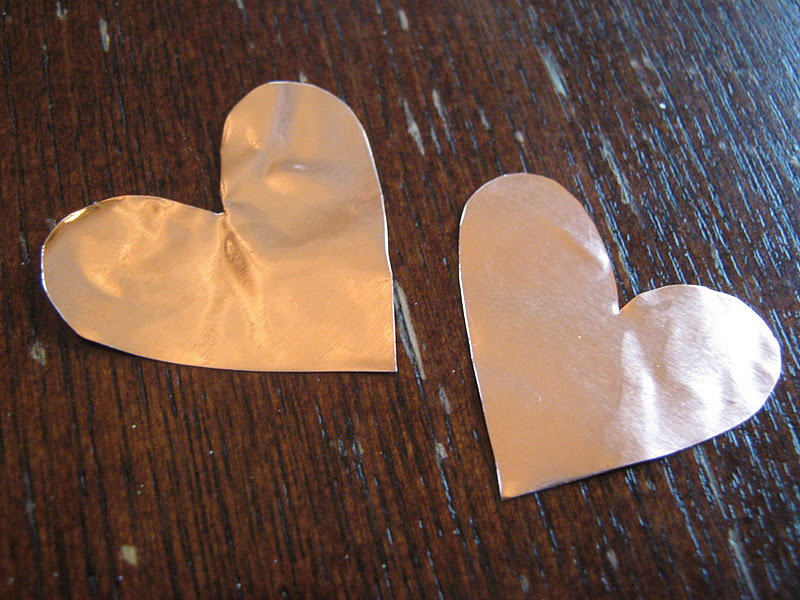
Now you can either write on them or leave them blank.
I used a sharpie to put the year we got married on one and our initials on the other.
Next, I glued on a piece of the garden twine to the backs for hanging over the branch.

Once the glue is completely dry, attach a foam square to the back of each one.
Hang them on the branch and press to stick to the background paper.
Attach another foam square to the back of the branch they hang from.


Lay the top mat over the bottom one.
Now you're ready to put everything back into the frame.


And now, the big reveal......


For my niece, I did the lyrics to Way Up In The Sky on the tree.
She's one and does all the body movements when you sing it to her.
So sweet.
Hanging off the branch is a paper bird house with a copper roof and the year she was born.
She's one and does all the body movements when you sing it to her.
So sweet.
Hanging off the branch is a paper bird house with a copper roof and the year she was born.


My nephew's has the words to the book Baby, Oh, Baby The Places You'll Go by Dr. Seuss.
My sister knows the whole book back to front by heart, from reading it to him so often when he was little.
I did a tire swing with his birth year hanging off the branch.


So there ya go - round two of my homemade Christmas gifts.
Round three comin' up soon.
My sister knows the whole book back to front by heart, from reading it to him so often when he was little.
I did a tire swing with his birth year hanging off the branch.


So there ya go - round two of my homemade Christmas gifts.
Round three comin' up soon.


This is by far my most favorite project of yours! My mouth literally gripped when I seen the copper hearts.
ReplyDeleteYeah, this turned out great. I love the slight variations with the hearts, birdhouse and tire swing.
ReplyDeleteYou're right, they ARE so cute! My favorite is the one with the birdhouse.
ReplyDeleteCute! Cute! Cute! What a clever idea. Thank you so much for sharing your tutorial. I'm pretty sure I'm going to try this one! Thank you again!
ReplyDelete